It’s that time of year when subject leaders might be considering their department handbooks so I thought I’d write a blog post (I know, first in well over a year) and share the template I use.
Now the purpose and value of a departmental handbook can be debated, but personally I find having one useful to consider my leadership approach, to support and guide my department staff and to demonstrate how the department aligns with the whole school policies and expectations.
The handbook is doesn’t replace conversations or departmental meetings, but is simply a ‘go-to’ guide and reference document for my team. Whilst my team are encouraged to ask questions and converse with me, as busy teachers if can often be difficult to find the appropriate time to ask questions or have conversations, I therefore use the department handbook as a first point of reference for the essential information.
Once you’ve a template set up, each year it is just a matter of editing which usually takes me about an hour or two in the summer term.
Let’s take a quick look inside the template (download available at end of post).
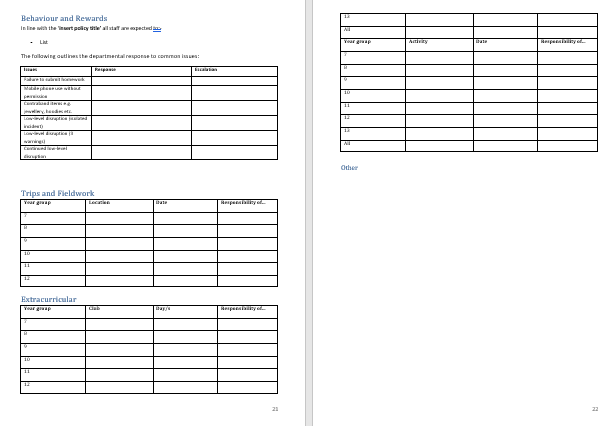
I’ve used heading and sub-heading styles along with a clickable contents page for easy navigation. Next is an outline of the department essentials – roles and responsibilities, teaching responsibilities, quality assurance, performance management, standardisation and moderation etc. We then go onto the curriculum with general outlines, approaches to lesson planning and homework. Then there is an outline of assessment and feedback which provides information and guidance on feedback, reporting and assessed work for the year. The document finishes with a brief outline of how we implement whole school behaviour and reward systems, an outline of trips and fieldwork opportunities as well as extra-curricular activities provided by the department.
The department handbook template can be downloaded by clicking the link below
This blog has been included by Twinkl among their blogs that all trainee teachers should be following.
Over the course of the current academic year I’ve delivered several virtual presentations for trainees and early career teachers. As an active ambassador for teacher wellbeing and mental health, I thought it might be beneficial to make a recording of my presentation for others to access and share.
The presentation which is provided below explores a variety of ideas, strategies and key messages to support early career teachers to manage their workload and prioritise their wellbeing. After each section, there is an opportunity for the presentation to be paused to allow for reflection and/or discussion.
I am providing these resources freely to support others, but if you would like to thank me for them, please consider making a donation to Education Support or something smaller to my Ko-Fi account which helps to keep my site running.
Sharing
What advice would you give to early career teachers? I’d love to collate the advice of others, so please feel free to leave a comment with your top tips.
Now that we’ve been teaching remotely for two weeks with the knowledge that we will be until (dare I say it) at least February half term, I’ve found that I’ve been able to refine my practice.
Despite teaching remotely for much of March – July last year, the regular changes, uncertainty and need to learn how to teach in such a way meant that it wasn’t really until June/July that I felt comfortable. Then from September to December, there was a lot of blended teaching and learning, which felt like trying to spin too many plates at once. Personally, I’m finding that my approach now, is far more conducive to learning.
I thought I’d share with you today my ‘remote teaching friendly’ PowerPoint template and a how to for setting up PowerPoints so you can type in a text box whilst presenting.
PowerPoint Template
For the first week of this term, I had to go over some content with my year 12 classes which they struggled with whilst some were remote and others were in school. So I made a PowerPoint to go through the content with them. This was actually the first time I’d used a PowerPoint whilst remote teaching.
Up until now, I’d stuck with the following routine introducing the lesson live, setting students off to work independently and then an AfL quiz or similar at the end of the lesson/series of lessons to check for understanding. They could leave the live meeting, but I’d keep it available in case they had any questions.
After using the PowerPoint with year 12, I decided I’d try it again whilst introducing the next topic. It would quite well to provide the visuals from the booklet and to engage my students in interpreting them before they went off to work independently.
After some further experimentation, a bit of reflection and some refinement, I’ve created a basic template for my remote lessons.
My template consists of the following:
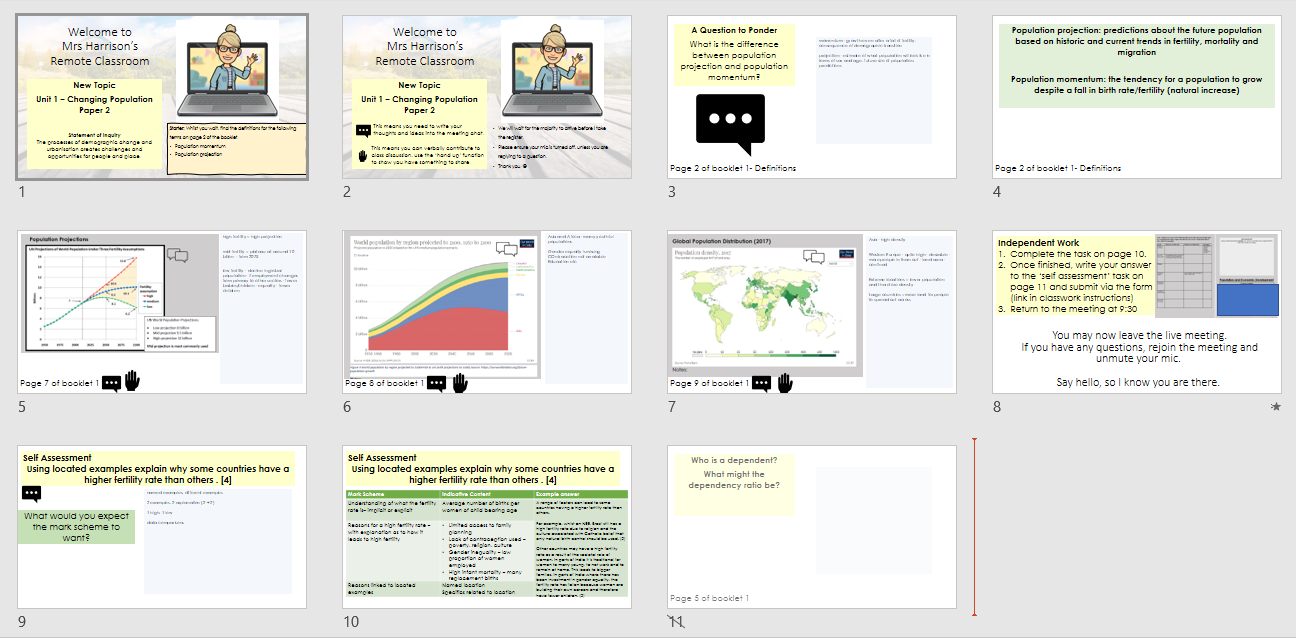
Introduction slides Slide 1 – Indicates the meaning of icons used to indicate what students should be doing. Slide 2 – Recall questions for students to answer whilst they wait for others to arrive Slide 3 – Slide for if I have a starter task to introduce the content of the lesson
Introduction Slide 1 – Indicates what different icons indicate. Introduction Slide 2 – Whilst you wait recap questionsIntroduction Slide 3 – Start activity if relevant
Main Slides I have a range of slides in my template to make use of as necessary. Slide 4 – Slide for a visual and a question Slide 5 – Slide for self-assessment Slide 6 – A Question to Ponder with a text box that can be typed in during presentation mode Slide 7 – Slide to give instructions for the independent working part of the lesson along with a reminder to return to the live meeting for the plenary Slide 8 – Plenary slide
I personally, don’t want my students to have to stare at a screen for the entire hour or feel they have to complete all of their work on a device, so my approach to the independent tasks has been the provision of a worksheet at KS3 and booklets at KS4 and 5. Students then have the choice to work digitally or on paper.
Here are some examples from this week:
Key Stage 3 Key stage 3 work is set lesson by lesson. Students can work digitally, on a print out or in their books. Students only submit specified pieces of work for assessment.
Key Stage 4 Students are given an outline of when to do each section of the booklet. My live part of the lesson introduces the content, they work on the specified pages and return for a review at the end. Students submit the finished booklet for checking.
Example of a GCSE Case Study BookletFirst Page of Booklet
Key Stage 5 Students are provided with the entire booklet at the start of the topic section. The live lesson element again introduces content, they work on the specified pages and return for a review at the end. Students submit the finished booklet for checking.
KS5 Booklet Example Example of Slide
I’ve attempted to create a remote lessons with a very clear structure so students know what to expect from one lesson to the next. I’ve written more about my approach to remote teaching, learning and assessment here.
How to write in a PowerPoint text box in presentation mode
Last week I took a bit of time to learn how to create a text box in my PowerPoint which would allow me to write down student contributions or to model an extended answer. Such a small thing, but this week completely changed how I engage my students remotely.
I thought it might be a skill others would find useful so I’ve put together a step-by-step tutorial to help you to set it up and present through Teams. Download below.
Despite 2021 starting off with a bit of toing and froing from government on whether school buildings would open for students or not, at least now we know we are teaching remotely until at least February half term.
Know that teaching and learning for the coming weeks will be online makes it much easier to plan and prepare for the term ahead. We can use the skills and knowledge we gained since March and implement it well as we are not going to on the conveyor belt of uncertainty. Yay.
So for my first post for 2021 (and first since September 2020), I thought I’d share how I am approaching remote teaching with a less is more attitude.
Teams Set up
Firstly I’ve set up the following channels on each team a) General (default channel – used for general communications with the class) b) Classwork (instructions for each lesson and any resources are provided here) c) Extend Yourself (any useful or interesting resources related to the topic or exam specification)
I have the following tabs on the general channel beyond the default ones: – Document library – entitled ‘Resources – Key Stage … ‘, this takes students to SharePoint where all my teaching resources are available. – Grades – this is a grade book for marked assignments (Teacher Only) – Insights – this tab is useful to monitor student engagement within the Team. It provides data on communications, downloads, time viewing documents etc. (Teacher Only)
Prior to period 1, I use the announcement feature in posts to outline the lesson. In the announcement post I provide the following information:
Time to join the Live Meeting (start of lesson)
Outline of the work to be undertaken
Resources needed for the lesson
How I will check their understanding
My morning announcements look something like this:
At the start of the lesson I start the meeting by clicking ‘Reply’ to my morning lesson announcement. I then select the ‘Meet Now’ function.
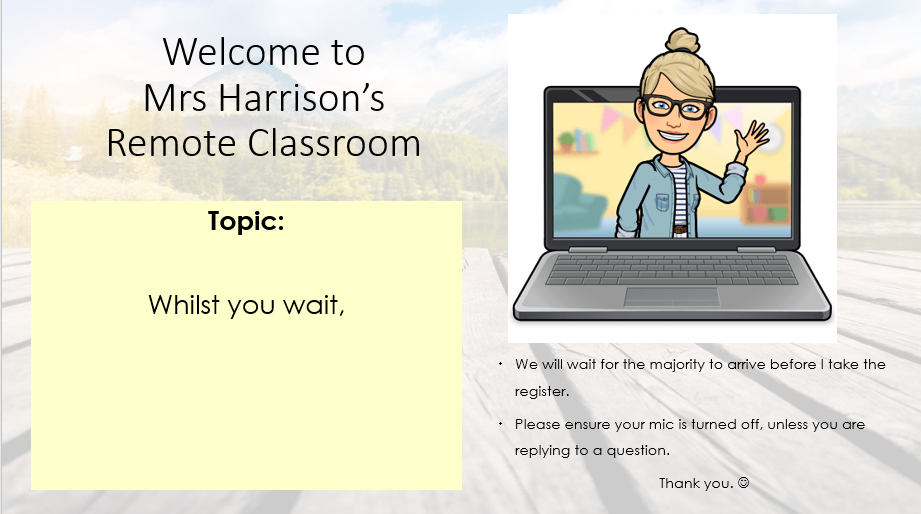
The meeting opens and students can join. At present I don’t use the lobby function so students enter straight into the meeting. I found myself getting flustered whilst they entered, I tried to set up any resources and welcome them at the same time. So since Thursday 7th January, I’ve been starting the lesson with a holding screen that welcomes students to the lesson, which is just a PowerPoint slide that I share. Since it is only one slide it doesn’t take long to load and gives me time to get comfortable.
After sharing on Twitter, I’ve decided that I’m going to introduce 3 recap questions to my holding slide and ask students to write their answers in the chat or similar. I’m aware that they might just copy each other but I’ll see how it goes for now.
My introduction to the lesson is usually quite brief. I tell the students the content they will cover, what they should know and understand by the end and quickly outline the content of the worksheet or booklet pages they will be completing.
Once I’ve provided the essential information for the lesson, I allow students to leave the meeting. However I keep it running for the entire hour so students can rejoin and ask any questions or seek support.
A few minutes before the end of the lesson, I send a message that lets students know the lesson is almost finished but to rejoin the meeting if they have any questions or issues. The last week I’ve also used the poll function to find out if they need more time next lesson.
I’ve tried to keep the work I set as simple as possible, so they require little instruction from me. However everything the student needs to complete the work is either included or linked within the document.
Worksheets or booklet pages general consist of the information, tasks, video links, reference to textbook pages and optional further reading. additionally, I try to include ‘extend yourself’ tasks for those that wish to go beyond the specification.
By providing worksheets with all the relevant learning materials, I hope that my students can then work through them at their own pace during the hour. At least then if they are experiencing any disruptions at home they don’t feel pressured to keep up with the rest of the class.
Here’s an example of a worksheet for GCSE:
Worksheet Example: GCSE Geography
Here’s an example of a section of a booklet for KS4:
Example of section of booklet: IB Geography
Up until this week I’ve not found it necessary to produce PowerPoints or videos for classes, but did create two short videos (Record PowerPoint, then Save as mp4 or wmp.) These were elements of the course content that students have found tricky, and despite showing a clear understanding of, some needed reassurance. The videos were uploaded to the class team and students could choose to watch them (or not).
Prior to this term, whilst teaching both in school and remotely, I’d been using Microsoft Forms to set an AfL quiz. I’d send the link about 15 mins before the end of the lesson as students start to finish off the main body of the lesson. Before the next lesson, I’d make note of any common errors or misconceptions and this would influence my planning. If they weren’t common, I’d make note of the student and check-in with them individually either in person (if in school), by commenting on their live work (if set as an assignment) or by email. If necessary, I’d provide individual support. Last week I didn’t find the time to produce them, but I want to reintroduce them this term as I found them really useful.
I ask my GCSE classes to upload their work to a ‘Classwork Submission’ assignment. Before Christmas this was after every lesson whilst they were learning remotely. I’ve now decided to make it weekly after our lessons on a Friday. I’ll do a quick check just to make sure they’ve done the work set. However, I don’t provide feedback on general classwork. Instead students can identify parts of the work they would me to review and feedback on for reassurance.
The other year I produced booklets for each topic of the IB Geography course (very grateful for that foresight now). Which has meant that Year 12 have been working from booklets since September whether they’ve been in school or at home. The use of Teams this year though has meant that at the end of the booklet, I can ask them to submit the booklet for checking. Which has been much easier than then emailing me their digital work or handing in their folders. This year I’ve also had year 12 doing an AfL quiz roughly once a week since September and this is something I will continue after the pandemic.
Additionally, I try to provide students with the answers to the worksheets so they can check and correct their own work at the end of the lesson or during the next lesson.
All of the above then support my planning. The following is an example of a resource produced for a review lesson based upon the AfL quizzes and classwork submission.
Review Lesson for Year 12 – Based on work submitted for checking and AfL quizzes
Assessed Work
My GCSE and IB students are continuing to complete PPQs at home in the same way we’ve always done using the AfL booklets they are provided with at the start of the course.
We cover content, AfL informs planning of next few lessons but no marking of classwork. After several lessons, students complete a set of past paper questions (PPQs) and submit via Assignments. PPQ influences starters, content review and revision lesson at end of topic.
Feedback
Feedback hasn’t changed much at all, well with the exception of less live verbal feedback.
KS3 Individual feedback on formative and summative assessed tasks through the rubric attached to the assignment. 4 topics, 7 formative assessed tasks, 4 summative assessed tasks across the year.
KS4 & 5
Individual Feedback Self-marking AfL quizzes Marks and codes on PPQs using Feedback function in assignments
Whole Class Feedback Verbal feedback (via meeting), mark scheme and coded feedback shared.
Self-assessment Students provided with answers to elements of worksheet at end of lesson, series of lessons or beginning of next lesson. Students self assess through check and correct process.
What my students say… A number of my students have been kind enough to give me feedback on the approach I’ve taken. The most common being that the work is easy to follow, they’ve appreciated that by not delivering a lesson via PowerPoint they are able to work at their own pace and that because I’m live they can ask questions when they arise during the lesson and receive a timely reply.
I hope this outline is helpful to those of you that are perhaps feeling swamped and out of your depth a bit. Unless your school is really strict on their expectations (I know some are), you don’t need to overcomplicate things. Think simple. If you’re finding online delivery overwhelming, it’s likely that your students will too.
I’ve found myself to be quite proficient at using Teams, so I’m happy to answer questions. Feel free to leave a comment, tweet me or email.
Wow, what a week. First full week back and it was certainly different. The number of times I left my whiteboard controller in other classrooms is close to double figures. Running back in the remaining minutes of lesson switch over certainly got my steps up.
I’m obsessed with finding time-saving and workload reducing strategies to enable high quality teaching without an excessive impact on work-life balance. During the last week, I started to consider how I could prepare myself for the day ahead to make lesson transitions quicker and smoother.
The following are some of the things I’ve started or will be implementing to help with life as a roaming teacher, hope you find some of them useful.
Note: A lot of my tips, depend on the use of technology. My school has allowed for students to bring their own devices. I’ll be allowing students KS3/4 students to have their phone on silent and on their desk (facing down) throughout the lesson in case they need to use it.
Feel free to share your #RoamingTeacherTips
Tips for Roaming Teachers
Daily Setup
1. Bookmark the web pages you use of a daily basis. Add them to a bookmark folder and set it up on the bookmark toolbar in your web browser. If you’re using a laptop you can open them up in the morning with one click (see video below) and leave them open all day. If you’re moving from one PC to another, you can do the same at the start of the lesson if required.
How to create bookmark folders and open all at once in Chrome
2. Although I embed the majority of videos into my lesson resources (How-to for embedding into Powerpoints & Word documents) sometimes I find something that I might use if I have time in the lesson or if the students take the lesson in that direction. I’ve therefore been opening these up in the morning and bookmarking them to the lesson folder (see below). At the start of the lesson I open all of the tabs in preparation.
My Bookmark Folders Sub-folders for each lesson under the main ‘Lesson’ bookmark folder.
Start of Lessons
As a roaming teacher, I’ve so far found that the start of lessons can be somewhat chaotic. Students are generally staying in the same classroom for all lessons, except for options at GCSE, meaning that students are in their seats and often ready before I am. To make this time productive I’ve done/will be doing the following.
3. My year 11 students have been given a pack of 6 GCSE retrieval practice sheets. I’ve assigned one per fortnight of this term and next and instructed that once settled they make a start of the assigned sheet until I am ready to start the lesson. They need to have completed it by the lesson in a fortnights time at which point we will go through the answers and self assess. If they complete prior to the deadline, they can move onto the next sheet in the pack.
4. For other classes, I’ll be setting up short quizzes to complete at the start of the lesson based upon last lessons work. So far, I’ve either not really taught any content, since we’ve had introduction and set up lessons or they’ve only had one content so these are on my to-do for this week. I’ll be using Microsoft Forms and posting the link to the quiz on Teams in the morning. Whilst I set up, students will use their own device (phone, tablet or laptop) to complete. If students don’t have access to their own device, I’m happy for them to complete the quiz with the person next to them and they can submit as a joint entry. This will mainly be used with KS3, year 10 and year 12.
5. In lessons I will use the PowerPoint, Word document or similar with the instructions and resources as usual, but will be posting the resources for the lesson onto the class Team to enable students to access the digital version at their own desk or at home. This is mostly relevant for KS4 and KS5 students to enable them to work at their own pace through the lessons work. It also means that when students require assistance they can tell me which page or slide they are on and I can support as required.
6. I loved using Teams whilst remote teaching. The ability to set up assignments and feedback digitally was really useful in my opinion. This year I’m using the assignments function for all homework & assessed work. For homework or assessed work, students can submit a digital copy if using own device or upload photo/scan of the work from their book. With assessed classwork (formative and summative) students will be given a time frame to submit it within before I assess and feedback.
7. If, and this is very rare, I need to collect in books or paper based work, students will pass their books to the end of the row, a box will be placed at the back of the room and as they leave, the pile will be popped in the box. I’ll collect the box at the end of the day to save me having to carry it around.
AfL and Feedback
One of the things I’m already finding difficult it not being able to circulate the room to assess understanding and provide verbal feedback in the moment. I can already envisage that I’ll be making even greater use of self and peer assessment along with modelling this year.
8. Digital submission of homework and assessed work means I can provide feedback via Teams. Before the Summer I ensured all of the assessed work which would be completed across KS3 had a feedback sheet which could be easily converted into a rubric on Teams. For staff, its just a case of copy and pasting to the ‘new rubric’ when setting up an assignment. Once a rubric has been created, it can be used again and again.
9. If students work directly on the resource provided via an assignment, the teacher can access and comment on the work in real-time. Whilst the majority of my KS3 and KS4 students will be working on paper, this I feel is particularly useful for year 12 and 13. This will allow me to see the work that the students are doing and provide timely feedback and support.
10. I used to collect books in from KS3 students for a quick book look in between pieces of assessed work and would complete a book look sheet. Later this would be shared and discussed with the class. As my practice has developed, I’ve reduced the need for this through effective and regular AfL in the lesson, modelling and self/peer assessment.
However, a lot of that came from being able to circulate the room. My plan this year is to make use of polls via Teams and mini-whiteboards (the school wide plan is that class sets will be available). During and at the end of the lesson to check understanding, I’ll pop a question on the class Teams ‘feed’ for students to answer, review the results and discuss any misconceptions. I’m not entirely sure how effective this will be but I’ll be giving it a try this week. When or if the tech isn’t available, I’ll revert to the mini-whiteboards.
11. I can already see that modelling and discussing success criteria is going to have even greater importance than it has previously. My lessons regularly make use of modelling through one of three ways:
a) pre-created example – shared via whiteboard or print out b) in the moment example – shared via visualiser or written in a word document and displayed on whiteboard c) student work – shared via visualiser
Now the first two I can continue to do, however the third is going to be a little trickier. My plan therefore is that students that volunteer their work can take a photo, upload it to Teams and I will open it from there and display on the whiteboard.
Moving resources around the school, oh my. I already do a large number of daily steps, so for me it’s no different, but my arms are not used to carrying so much around. Initially, I was carrying folders, laptop, equipment etc. in multiple bags, boxes and folders. By the end of the week I had it organised as follows.
12. Invest in an expanding folder (or similar). I’m popping my printed resources in order of my lessons. I have this one from Paperchase and it fits plenty of resources in, including my A4 school planner.
13. I’ve been using slip-in wallets like these for sometime for storing paper based homework and assessed work (mainly from KS4 & KS5). Each one is labelled up with the year group. This year, I’ll be continuing with this method as and when required. I’ve stored all 8 in the very last section of my expanding folder. This week when I needed to collect in some retrieval sheets, I popped the relevant file on an empty table at the start of the lesson. At the end, students collated the sheets and one student popped them inside the wallet which went back into my expandable folder. Easy with limited touch and interaction.
14. I realised this week I need a clear pencil case or similar to keep my whiteboard pens, a cloth, whiteboard remote and the like. The majority of the week they were in the pocket of my laptop bag, but this made it difficult to do a quick visual check to ensure I had everything. To solve this I’ve picked up a clear zip-seal wallet, so at the end of the lesson I can do the quick ‘leaving the classroom’ routine have I got my… *insert list of items here*.
15. Thankfully, our students are very well prepared so I don’t need to carry general stationery around with me, but I know of teachers elsewhere that are. They’ve therefore invested in travel cases and the like to help them to move everything from room to room.
In my first few years of teaching I used the collapsible ones for dragging books to and from school, I highly recommend them. Incredibly useful.
Some examples:
One of these, just keep everything in it. I've a pouch for whiteboard pens, duster, ruler, fileblock etc. Plus using OneNote planner, with all ppt/word/videos I'll need linked to each class. pic.twitter.com/wl5BehP08G
To discover tips from others, check out the thread below
🧵Thread🧵 Thought I'd share with you some of the things I've done to make being a roaming teacher easier#roamingteacher 1. Set up all of my important Internet tabs into a single bookmark folder, in the morning I right click & select open all tabs. All open ready for the day.
If you are looking to encourage students to read beyond the specification, here’s a sheet that maybe of use for geography.
I’m really fortunate that we have an ever-growing library and an incredible librarian that supports and promotes reading and research across the school. These are a small selection of the books that occupy the shelves of the school library.
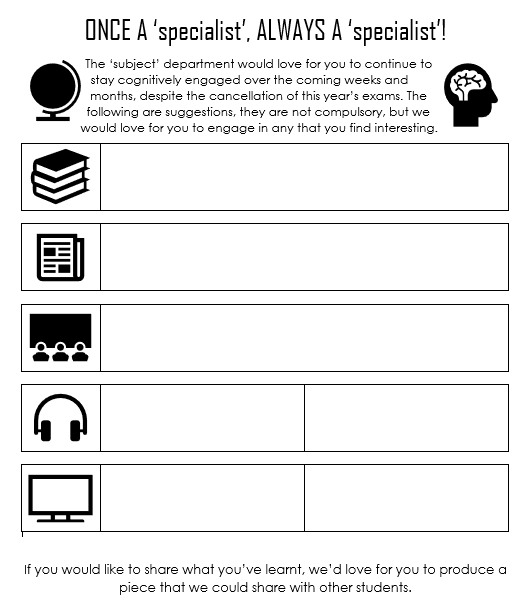
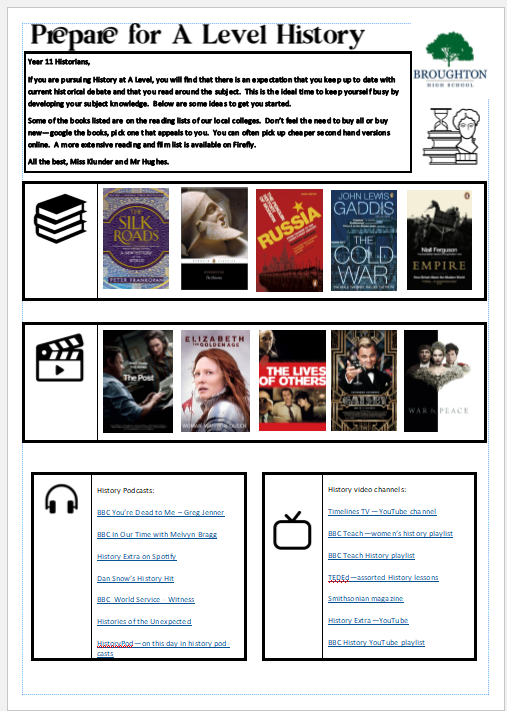
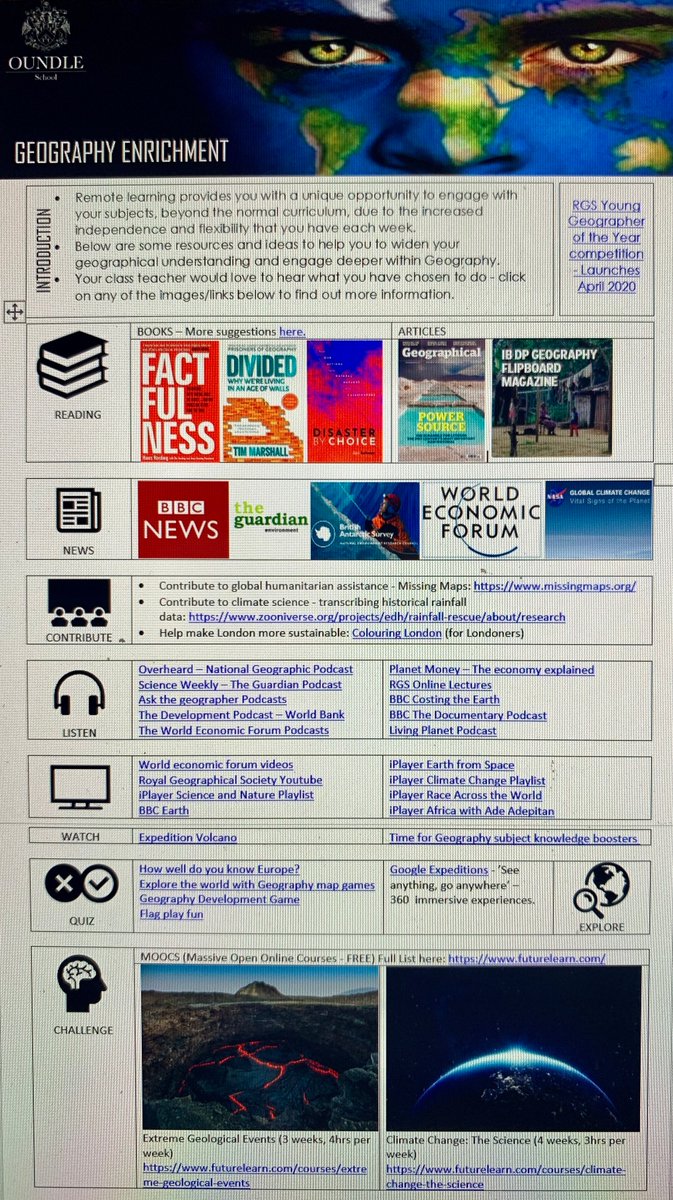
The other day I shared my ‘Keep learning…’ sheet to help year 11 and year 13 to continue learning despite the cancellation of this year’s exams.
Since then others have downloaded the template and made there own for a wide range of subjects.
Initially I added them to the original post however the numbers are rapidly increasing and the post has gone from one page to two. To make it easier, I’ve collated them into a single folder.
A massive thank you to all those that have already shared their version. And if you have made your own version and you are happy to share it, either pop it in cloud storage and DM me a link or email me at mrshumanities@outlook.com
Hope you can make use of the resources so kindly shared.
Since I had a number of people email and DM to ask for access I figured I’d a share the resources with you. They are a basic outline for the teacher to adapt to suit their approach to inquiry based learning, so they’re pretty much the bare bones with resources that maybe an option.
The only compulsory parts of the resources are the assessed work and tasks that develop particular approaches to learning (AtLs).
The topic starts with an exploration of the types of and scale of issues.
It then explores the sustainable development goals, encouraging students to connect the SDGs to global issues they are aware of. After exploring the SDGs, students will have an understanding of the importance and role in sustainable development.
After the SDGs, students explore the problem with plastic. These lessons look at why plastic became so popular, why it is problematic and who’s responsible for the problem.
The lessons strive to give students an understanding of the variety of different perspectives on both the issue and the management in order to understand the challenges of dealing with any global issue.
A number of lessons also help students to develop particular approaches to learning, for instance one lesson aims to teach students the art of paraphrasing. This lesson was developed with support from the English Department.
Each element of the topic develops skills and knowledge that will allow students to transfer what they learn to a global issue of their choice in order to complete the summative assessment.
All assessed work (2 formative and 1 summative) and associated feedback sheets are provided, this is to ensure consistency in assessment and feedback across the department.
If you’d like access to the resources, simply click here to download them. This link is view only, if you wish to edit the resources please download.
Click the symbol in the circle to download.
Hope you can find the resources of use to develop your own from.
At the end of the last academic year, my colleague and I sat down to design a new unit for year 7 that would inspire and empower them to feel that they can do something about the global issues they worry about.
Before we sat down to create our unit, I’d already discussed the idea with some of my year 7 students and they helped me to formulate a few ideas. By the end of our collaborative session, I had a brief outline to take to my colleague for exploration and discussion.
Main points from my students included:
- they worry about global issues but feel they have no involvement in dealing with them
- they felt they didn't have a voice in the issues that WILL affect them (climate change and the consequential problems primarily)
- some knew enormous amounts about particular environmental issues but never got to make use of their understanding
- they wanted to feel empowered
- they wanted to learn about the solutions as much as the issues
MYP Unit Plan
It’s pretty lame, but I was really excited about creating this unit as it would be the first one I’d had the opportunity to create from scratch. I’d started as Subject Leader in September 2016 and inherited the MYP plans already in place. In the first few years, the departmental focus was on developing the new GCSE course & the new IB ESS course initially, followed by the new IB Geography course. MYP would stay as it were until the new exam courses were in place. Instead with the help of the team, we updated the existent MYP units.
Now however is the time to improve the MYP curriculum, to make it the foundations for future geographical study and to make learning, assessment and feedback fully integrated through the 3 years so that everything builds on what has come before.
Year 8 and 9 (MYP years 2 & 3) are functioning well thanks to the changes and developments over the last few years, however year 7 (year 1) needs quite the overhaul to make it truly fit for purpose. So this is where the ‘new’ department and I have started.
An MYP unit plan looks something like this (please note however that I added SDGs they are not a common feature):
Designing our unit
The first part of designing a new unit is to decide upon the final outcomes – what do we want students to learn and take away from the unit of study?
There are three areas of the unit plan we needed to explore before we could decide on these outcomes, these were a) the content to cover b) the objectives of the unit c) the summative assessment
We started by writing a brief outline of the content we thought appropriate whilst at the same time formulating a few key objectives. Once we had a rough idea, we discussed the summative assessment and how the three would connect. This was all rough and nothing was set at this point.
Once we had a rough idea, we went back to the core elements of an MYP unit; the key concept, relate concepts, global context and statement of inquiry. The aim of these are to establish the purpose of the unit.
From there we created the inquiry questions for the unit, these are broken down into factual, conceptual and debatable questions. These questions guide the learning and are asked throughout the unit to check for understanding.
The next stage of developing a unit is going back to the objectives, content and summative assessment and fine tuning these so they integrate the inquiry questions.
We decided upon the following objectives and summative assessment for the unit:
The unit would develop student understanding of one global issue together – we selected the plastic problem. We would teach students about the issue, management (including responsibility) and a select few solutions to the plastic problem. Student will then use this outline to structure their own awareness raising campaign, which makes up the summative assessment.
Our next focus for discussion returned to the content. We had our objectives and summative assessment decided we now needed to align the content, approaches to learning and formative assessment to these.
We started by breaking down the content and working out the sub-content.
Once the sub-content was determined we explored the approaches to learning that could be developed through the content delivered. Students would cover the AtL – Research (information literacy) in unit 1, so we wanted students to build upon this and selected a further two as shown below.
Now that we had our objectives, summative assessment, AtLs and content sorted we could consider the formative assessment – these are pieces of work that are assessed by the teacher and feedback is provided to the student. These are the only pieces of work teachers are expected to assess. All other work can be assessed through book looks with feedback provided via whole class feedback, assessment for learning strategies or peer/self assessment.
The aim of any formatively assessed work is that it should feed into the summative assessment and future work. Thus meaning that any feedback provided ought to be transferable between topics – thus developing the learner not the work.
We decided upon the following:
And added in where the formative work fitted into the content.
The final stage involved completing other elements of the ‘learning process’ section which include the learning experiences & teaching strategies along with differentiation (scaffolding).
After this unit, we created two more units using the same process. However the one difference being ensuring that content and approaches to learning developed through this unit, fed into units 3 and 4 of year 7 (MYP year 1).
Assessment for Learning and Feedback
In order to reduce the workload of assessment, teachers and students are provided with a feedback sheet prior to the task. These sheets outline the success criteria for the task. Here’s an example for formative work 2.
Teachers are encouraged to live mark whilst students work, pointing out the next steps the student could take before completion of the task.
My classes do a lot of what I call ‘messy progress’ , this means they are encouraged to add to their work, this can be in the margins, as footnotes or through the use of edit strips, encouraging them to self-assess their work and look for their own potential improvements before submitting as complete. It may end up looking something like this:
Once a formative piece is completed the teacher simply highlights the successes achieved and any relevant next steps. If teachers have any specific feedback for individual students they can either write it in or speak to the individual during the lesson in which they receive their feedback.
Summative feedback looks very similar, except an MYP grade is provided for the criterion assessed.
The key part of producing feedback sheets is that you have to know what you want your students to achieve through the task. This therefore requires an element of planning backwards.
Lesson Planning
From unit planning came lesson planning. During my gained time I created a set of outline lessons to cover the content of the unit. These are just outlines for the class teacher to amend to suit their approach.
Hope you found the post of use, feel free to share how you go about planning a new unit or SoW.
It was around this time 5 years ago I first stumbled across #Teacher5aday. It felt like a breath of fresh air; something that gave me permission to put me first. As selfish as that may sound, it was something I hadn’t done since becoming a teacher.
At the time I was at a difficult school, one with high expectations for staff which meant high workload as well as many behavioural issues and lack of senior support in managing it. I was doing detentions most lunch breaks and regularly after school and didn’t have much time for a break during the school day.
Just before I came across #Teacher5aday I recorded my workload in order to ask for support (if interested you can see the workload diary here). I was working long hours and long weeks and putting my job before my health and wellbeing. I was constantly exhausted, snappy with my partner, always saying no to friends and generally not a likable person to be around.
There was an element of change when I came across #Teacher5aday. I felt like it gave me permission to say no. I felt like it gave me the support to say no. I felt like I was part of something.
Over Christmas, I came up with my first set of #Teacher5aday pledges and published them on December 30th 2014. You can read them here.
“I will be the first to admit that I get stressed, I work and work and work and then I buckle under the strain. I don’t speak up until I’m about to hand my notice in. I don’t rest and feel guilty when I give up because I’m too exhausted to do anything.”
30th Dec 2014
The pledges were going to hold me to account. I was going to work hard to connect, exercise, notice, learn and volunteer over the coming year. I was going to do things for me and my loved ones. School was going to come second. Okay whilst that didn’t exactly happen, the pledges made me start thinking about how I was not looking after my own health and wellbeing. They gave me a daily focus and encouraged me to take time out from working where I could. That first January went better than expected, but then the workload went up several notches and the stress and anxiety kicked in. But there was a difference in how I handled it as you can see in the quote below from my end of January reflection.
This year started like any other, calm and relaxed and then boooooom! Workload went into overdrive. However there has been a slight difference in how I’ve coped with it. Normally I’m calm and placid in school but when I get home my frustration and stress comes out; I snap at Mr Humanities, eat tons of chocolate, work long hours, try to sleep but end up tossing & turning… the list goes on. The start of 2015 has been very different.
Keeping the idea of #teacher5aday in my mind has helped me to remain calm (most of the time), I had a wobble before school the other day but survived it through a chat with a HLTA and good friend. Phew. So far any time this term I’ve felt my blood pressure rising I’ve taken the time to think about ME and not felt guilty about it. How nice is that
1st Feb 2015
Knowing that there is a network of other teachers out there thinking about THEIR wellbeing made a big difference. It gave me the courage to put time aside, even if it was only one day on the weekend leaving me with just 6 to do the work. Knowing others were doing similar gave me confidence.
That support and confidence has continued and 5 years on I’m in a much better place (literally and metaphorically).
I made pledges again in December 2015 and 2016. However come December 2017 I felt that I didn’t need to make pledges anymore because my mindset and circumstances had changed.
I was no longer at the school that causes me to burnout and breakdown. I was actually saying no and I meant it. I was only working weekends when it really necessitated it. I wasn’t working until late each night. I had found strategies to manage my workload in the 4 months at my new school. I was taking anti-depressants and my mental health was improving. I had support from EduTwitter friends and loved ones. I felt I could manage.
Teacher5aday is always in my mind, it’s given me many fantastic friends, connected me with many through #Teacher5adayBuddyBox and changed how I approach wellbeing and mental health. I even wrote a whole section about it in ‘Making it as a Teacher‘.
There was a time when I didn’t recognise the importance of looking after myself. I’d plough away at the to-do list and work and work until I broke. That was no good for me, my students or my loved ones. #Teacher5aday helped to change that. Whilst it may only be a small part of a bigger story, the 5 elements and the support of a great community got me through some very difficult times. It changed my mindset and now I proactively look after myself. Why? Because ultimately it makes me better at my job, benefits my loved ones and makes me happier in both work and life.
All that is left to say then is a massive thank you to Marty Reah!
You’ve done an incredible job of putting wellbeing at the forefront of our minds, of bringing people together and ultimately improving the lives of many school staff and their students. For that I am sure there are many that would like to say a massive THANK YOU.